openSUSE:WebYaST ExamplePlugin
开发示例插件
本教程将向您展示如何为 WebYast 创建一个模块。该模块将是一个简单的文本编辑器,用于读取和写入位于 /var/log/YaST2/example_file 的文件。请注意,只有用户 root 具有访问 /var/log/YaST2 的权限。因此,此示例模块还演示了其他用户如何获得对该文件的访问权限。
适用于 WebYaST >= 0.3 的示例插件
设置环境
目前有不同的方法可以获得正在运行的开发环境
较短的方法是第一个。所以我们选择这个。
简单的方法...
...将是通过 RPM 安装示例插件并与之交互。所需的软件包可以在这里找到
请下载并安装适合您的 SuSE 版本的 RPM,并使用以下命令重新启动 WebYaST
rcwebyast restart
示例插件现在已准备好使用。
复杂的方法...
...将是手动创建上述 RPM 包中包含的所有插件文件。这种方法需要更多的工作,但更深入地展示了 WebYaST 的工作原理。
定义 PolkitPolicies
每个 Yast 模块都提供自己的策略文件,该文件定义了可以授予用户的操作。它们存储在 /usr/share/polkit-1/actions/ 中,通常具有 org.opensuse.yast.system.module_name.policy 的形式。对于示例模块,我们需要类似文件读写权限的东西,因此创建 org.opensuse.yast.system.example.policy 文件并将这些行添加到其中
<?xml version="1.0" encoding="UTF-8"?>
<!DOCTYPE policyconfig PUBLIC
 "-//freedesktop//DTD PolicyKit Policy Configuration 1.0//EN"
 "http://www.freedesktop.org/standards/PolicyKit/1.0/policyconfig.dtd">
<policyconfig>

  <vendor>YaST Webservice Project</vendor>
  <vendor_url>https://en.opensuse.net.cn/YAST</vendor_url>

  <action id="org.opensuse.yast.system.example.read">
    <description>Description of action</description>
    <message>Authentication message which appear on desktop (not affect webyast)</message>
    <defaults>
      <allow_inactive>no</allow_inactive>
      <allow_active>no</allow_active>
    </defaults>
  </action>

  <action id="org.opensuse.yast.system.example.write">
    <description>Description of action</description>
    <message>Authentication message which appear on desktop (not affect webyast)</message>
    <defaults>
      <allow_inactive>no</allow_inactive>
      <allow_active>no</allow_active>
    </defaults>
  </action>
</policyconfig>
授予 PolkitPolicies
如果您想在开发期间监视您的模块,您需要授予登录到 WebYaST 的用户(例如 root)一些权限。
/usr/sbin/grantwebyastrights --user root --action grant --policy org.opensuse.yast.system.example.read
/usr/sbin/grantwebyastrights --user root --action grant --policy org.opensuse.yast.system.example.write
由于 WebYaST HTTP 服务器也将访问该文件,因此我们必须授予这些权限给 HTTP 服务器用户(WebYaST 服务器在用户 webyast 下运行)。
/usr/sbin/grantwebyastrights --user webyast --action grant --policy org.opensuse.yast.system.example.read
/usr/sbin/grantwebyastrights --user webyast --action grant --policy org.opensuse.yast.system.example.write
D-Bus 服务
D-Bus 服务在 root 下运行。此服务处理对 /var/log/YaST2/example_file 的“真实”文件访问。
有两种方法可以创建 D-Bus 服务。您可以使用现有的 YaST 模块并仅创建一个 D-Bus 接口,或者您可以编写一个独立的 service。
由于没有用于读取/写入文件的 YaST 模块,因此此处使用独立的、与 YaST 无关的 D-Bus 服务。
D-Bus 服务:example.service
D-Bus 接口:example.service.Interface
D-Bus 对象路径:/org/example/service/Interface
创建 D-Bus 服务
D-Bus 服务可以使用各种语言编写。由于 WebYaST 本身是用 Ruby 编写的,因此下面的示例也是用 Ruby 编写的。
将以下骨架放入您选择的二进制路径中,以便与下面的示例匹配,放入 /usr/local/sbin/exampleService.rb
第一部分连接到系统总线并注册服务。
#!/usr/bin/env ruby
require 'rubygems'
require 'dbus'

# Choose the bus (could also be DBus::session_bus, which is not suitable for a system service)
bus = DBus::system_bus
# Define the service name
service = bus.request_service("example.service")
创建对象类及其接口。在接口中,创建所有方法。
在下面的示例中,该接口提供了两种方法
- read,它读取指定的文件并将其作为字符串返回(请注意,需要将其括在数组中,因为 DBus 有多个返回值,因此它返回返回值的数组)
- write,它将指定的字符串写入文件。
class ExampleService < DBus::Object
  FILENAME = "/var/log/YaST2/example_file"
  # Create an interface.
  dbus_interface "example.service.Interface" do
    # Define D-Bus methods of the service
    # This method reads whole file which name it gets as a parameter and returns its contents
    dbus_method :read, "out contents:s" do
      out = ""
      begin
        File.open(FILENAME, "r") {|f| out = f.read }
      rescue
        out = "<empty>"
      end
      [out] #return value must be array, as DBus allow multiple return value, so it expect array of return values
    end
    # This method dumps a string into a file
    dbus_method :write, "in contents:s" do |contents|
      File.open(FILENAME, 'w') {|f| f.write(contents) }
      []
    end
  end
end
创建对象并通过其路径导出它。
# Set the object path
obj = ExampleService.new("/org/example/service/Interface")
# Export it!
service.export(obj)
运行事件循环(在本例中,事件循环永远不会结束)。
# Now listen to incoming requests
main = DBus::Main.new
main << bus
main.run
使此文件可执行
chmod 755 /usr/local/sbin/exampleService.rb
创建所需权限
编辑/etc/dbus-1/system.d/example.service.conf并添加以下内容以授予访问和注册服务的权限
<!DOCTYPE busconfig PUBLIC "-//freedesktop//DTD D-BUS Bus Configuration 1.0//EN"
  "http://www.freedesktop.org/standards/dbus/1.0/busconfig.dtd">
<busconfig>
  <policy user="root">
    <allow own="example.service" />
    <allow send_destination="example.service" />
  </policy>
<!-- yastws user is one which runs yast webservice and
  he sends messages to service -->
  <policy user="webyast">
    <allow send_destination="example.service" />
    <!-- introspection is allowed -->
    <allow send_destination="example.service"
           send_interface="org.freedesktop.DBus.Introspectable" />
  </policy>
  <policy context="default">
    <deny send_destination="example.service"/>
    <deny send_destination="example.service"
           send_interface="org.freedesktop.DBus.Introspectable" />
  </policy>
</busconfig>
没有此文件,您甚至无法注册服务以进行测试。
上述配置允许 root 注册服务,用户 webyast 使用它。因此,该服务不能被任何其他用户使用,除了 webyast,其权限由 WebYaST 使用。
注意:如果您想在其他用户下运行 WebYaST 服务器,请调整此文件。
启动服务
要自动启动服务,请创建服务激活配置文件/usr/share/dbus-1/system-services/example.service.service并添加以下内容
# DBus service activation config
[D-BUS Service]
Name=example.service
Exec=/usr/local/sbin/exampleService.rb
User=root
保留 [D-Bus Service] 部分名称,只需更新服务的名称和要执行的二进制文件。
测试服务
要测试服务,只需调用其方法。以下示例显示了如何调用 D-Bus 服务。(在用户 root 下运行此操作)
#!/usr/bin/ruby
require 'rubygems'
require 'dbus'

bus = DBus.system_bus
ruby_service = bus.service("example.service")
obj = ruby_service.object("/org/example/service/Interface")
obj.introspect
obj.default_iface = "example.service.Interface"
puts obj.read
必须启动该服务 - 除非它自动完成(如下所示),只需运行/usr/local/sbin/exampleService.rb作为用户 root。
WebYaST rails 插件
准备
要开始正常开发,您需要通过签出 git 仓库并安装所需的软件包来获取源代码。有关更多信息,请参阅 从源代码安装。在我们的示例中,我们使用已安装在 /srv/www 目录中的实际 WebYaST 服务,因为包安装。
WebYaST 的所有模块都存储在 plug-ins 目录中,因此打开终端并为您的模块创建一个新目录
  cd /srv/www/webyast/vendor/plugins
  mkdir example/
  cd example/
至少您的新模块应该具有 app config lib package tasks 和 test 目录。继续创建它们。
mkdir app config lib package tasks test
现在更改目录到 app/ 并为模型、视图和控制器创建目录。
cd app
mkdir models views controllers
在开发期间,在一个单独的终端中打开生产日志可能会有所帮助。
tail -fn 100 /srv/www/webyast/log/passenger.log
模型
在模型中,您将定义示例类及其所有属性和方法。我们只需要一个变量来表示文件的内容。
更改目录到 models/ 并创建文件 example.rb。
可以使用 Ruby 的 attr_accessor 定义对变量的访问。我们需要在这里读取和写入访问权限。
class Example < BaseModel::Base
 attr_accessor :content
我们不从 ActiveRecord::Base 继承 Example,因为我们不需要数据库。但在许多具有复杂数据结构的情况下,我们需要定义自己的 to_xml 和 to_json 方法
  def to_xml(options = {})
    xml = options[:builder] ||= Builder::XmlMarkup.new(options)
    xml.instruct! unless options[:skip_instruct]
..
..
  end

  def to_json(options = {})
    hash = Hash.from_xml(to_xml())
    return hash.to_json
  end
这些方法将给定类的属性转换为 xml 或 json 格式,并将其作为返回值提供。请参阅其他插件以获取更多信息。
在我们的示例中,这些方法不需要,因为数据结构太简单。因此,我们可以使用 BaseModel::Base 类的标准 to_xml 和 to_json 方法。现在让我们提供一些功能
  def initialize
    load_content
  end

  def load_content
    @content = dbus_obj.read
  end
使用 Example.new() 可以获取 Example 类的实例。此时,文件的内容已经读取并可用。
  def self.find(what=:one,options={})
    ret = Example.new
    ret.load_content
    ret
  end
每个模型类都应该有一个 find 方法才能获取数据。在我们的例子中,它与 initialize 方法相同,但还有一些其他情况,例如用户模型,其中 find 方法非常有用
- User.find(:all) 返回包含所有用户的数组
- User.find('tux') 返回用户 'tux' 的对象。
  def update
    dbus_obj.write @content
  end
此方法用于将内容写入文件。如您所见,我们使用 DBUS 服务来写入文件。此时不要使用 IO 方法。它会给您带来麻烦。由于 WebYast 将作为服务运行,它将拥有自己的用户 webyast。该用户将没有 root 权限,但将通过 DBUS 服务和我们之前定义的 PolicyKit 权限访问系统。
最后,dbus_obj 助手,它通过上述 D-Bus 服务读取和写入
  def dbus_obj
    bus = DBus.system_bus
    ruby_service = bus.service("example.service")
    obj = ruby_service.object("/org/example/service/Interface")
    obj.introspect
    obj.default_iface = "example.service.Interface"
    obj
  end
end # the end of the model class
现在,由于我们可以读取/写入文件 /var/log/YaST2/example_file,我们可以继续使用控制器。
控制器
控制器将模型(如上所述)与表示视图(下一章)连接起来。Web 浏览器向 WebYaST 发送 GET 请求,并期望文件内容作为响应。这可以是 html、xml 或 json 格式,如我们在模型中定义的。另一方面,Web 浏览器可以发送 POST 请求到 WebYaST,以便更改文件。
更改目录到 controllers 并创建文件 example_controller.rb
 cd ../controllers
 vi example_controller.rb
class ExampleController < ApplicationController

  #require login before do any action
  before_filter :login_required
ApplicationController 是 WebYaST 的一部分,并提供一些我们需要的方法。因此,定义类 ExampleController 并从 ApplicationController 派生它。before_filter 将在调用任何操作时执行 login_required。它检查用户是否已登录,如果未登录则重定向到登录屏幕。
  # Initialize GetText and Content-Type.
  init_gettext "webyast-example"
这部分仅在您想为您的 UI 提供其他语言/翻译时才需要。有关更多信息,请参阅 国际化 部分。
现在让我们定义 show/index 方法,该方法必须响应 GET 请求并收集数据。
  def index
    permission_check "org.opensuse.yast.system.example.read"
    @example = Example.find

    respond_to do |format|
      format.xml  { render :xml => @example.to_xml}
      format.json { render :json => @example.to_json }
      format.html { @write_permission = permission_granted? "org.opensuse.yast.system.example.write"
                    render :index }
    end
  end

  def show
    index
  end
首先 permission_check 检查用户的权限。如果用户无权读取安全信息,则 show/index 操作会引发错误 403 并停止。否则,它会通过调用其 find 方法创建一个新的 Example 对象。
show/index 操作通过调用视图(如下一章所述)来响应 Example 对象,如果请求具有 html 格式,或者以 xml 或 json 格式返回 Example 对象。
第二部分将通过 POST 请求写入值。
  def update
    permission_check "org.opensuse.yast.system.example.write"
    value = params["example"]
    if value.empty?
      raise InvalidParameters.new :example => "Missing"
    end
    @example = Example.find
    @example.content = value["content"] || ""
    error = nil
    begin
      @example.save
    rescue Exception => error
      Rails.logger.error "Error while saving file: #{error.inspect}"
    end
    respond_to do |format|
      format.xml  { render :xml => @example.to_xml}
      format.json { render :json => @example.to_json }
      format.html { unless error
                      flash[:notice] = _("File saved")
                    else
                      flash[:error] = _("Error while saving file: %s") % error.inspect
                    end
                    index }
    end
  end

  # See update
  def create
    update
  end

end #close the ExampleController class
在权限检查之后,如果没有定义参数,将引发参数错误。在 HTML 请求的情况下,在显示它之后,将调用 index 方法来写入值。如果它是 XML 或 JSON 请求,将返回已保存文件的当前内容。
视图
在视图中创建一个名为 example 的新目录,并为 index 操作编写一个视图。
cd ../views
mkdir example
vi example/index.erb
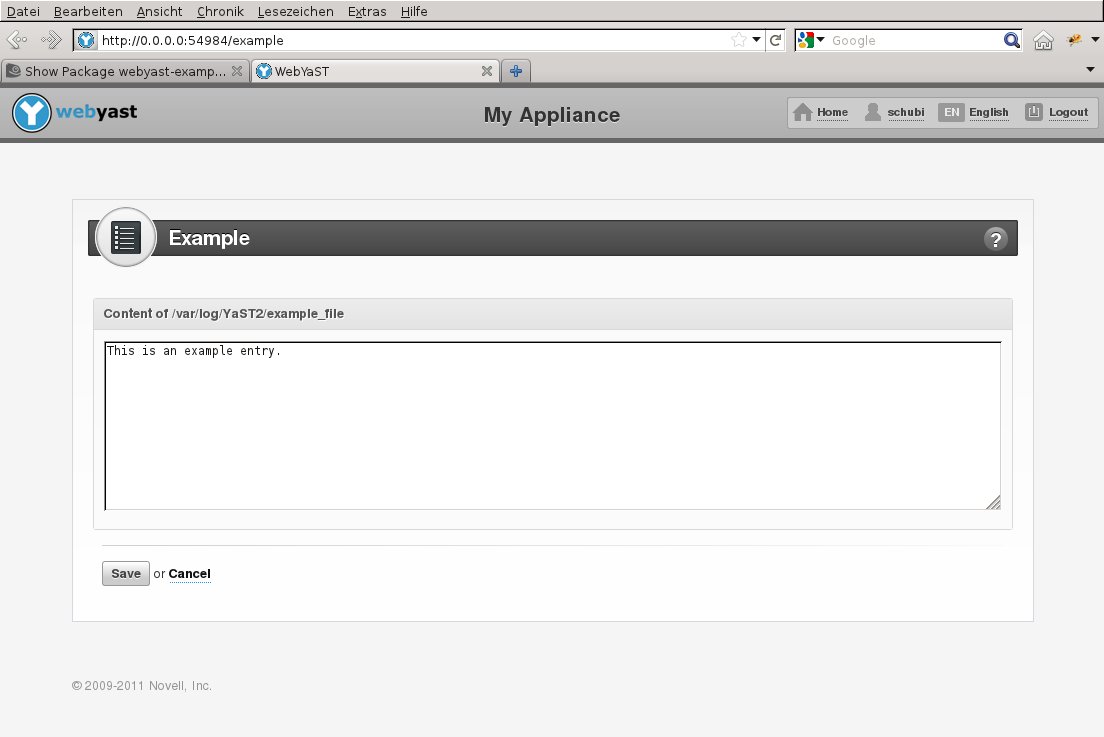
该视图仅包含一个文本区域,该文本区域显示文件的当前内容。该值可以由 Save 按钮更改和保存。
<div class="plugin-content plugin-border">
    <% form_tag '/example/update', :class => "webyast_form" do %>
      <div class="plugin-header">
        <div class="left">
          <label class="plugin-icon-container"><img class="plugin-icon" src="/icons/example_plugin.png"></label>
          <label class="plugin-name"><%=_("Example")%></label>
        </div>
        <div class="right" >
          <span id="questionMark" style="margin:2px 5px; float:none;">?</span>
        </div>
        <div class="clearfix"></div>
      </div>

      <div class="clearfix"> </div>
      <fieldset class="webyast_fieldset">
        <div class="fieldset_header">
          <span class="fieldset_header_title" >
            <%=_("Content of /var/log/YaST2/example_file")%>
          </span>
        </div>

        <div class="fieldset_body">
          <div class="row">
            <%= text_area(:example, :content, :cols => 125, :rows => 10) %>
          </div>
          <br>
        </div>
      </fieldset>

      <div class="button_container">
        <div class="hr"> </div>
        <div class="nav-buttons">
          <%= form_send_buttons :disabled => !@write_permission %>
        </div>
      </div>

    <% end %>
</div>
views/example/index.erb 几乎是纯 html。只有一些变量用于文本区域、翻译和权限嵌入在 ruby 代码中。通过在控制器中调用 permission_granted?,我们设置了变量 @write_permission,该变量为 true 或 false,并决定用户是否能够编辑文本区域。
定义路由
通常路由将在中央文件 config/routes.rb 中处理。由于此文件属于 WebYaST 基本包,因此我们不想手动编辑它。因此,每个插件都在插件/example 目录中的 config/resources/example.yml 中定义了自己的路由描述。
cd ../../config
mkdir resources
vi resources/example.yml
此文件的内容是
#interface can be anything
interface: org.opensuse.yast.system.example
#controller is path on which can be service located
controller: example
#singular set if it is singular REST service or not
singular: true
为 WebYaST 添加启动图标
转到 plugins/example 并创建一个名为 shortcuts.yml 的文件,其中包含以下内容,以将图标添加到您的模块的控制中心。
cd ..
vi shortcuts.yml
文件内容将是
main:
  icon: '/icons/example_plugin.png'
  url: /example
  groups: [ System ]
  title: _("Example")
  description: _("This is an example plugin only")
  read_permissions: [ org.opensuse.yast.system.example.read ]
将您自己的图标复制到 /srv/www/webyast/vendor/plugins/example/public/icons/example_plugin.png
您可以重用存储在 /srv/www/webyast/public/icons 中的一些 WebYaST 图标。
每个文本字符串周围的 "_(....)"
这种机制用于标记在UI中显示的并且需要提供多种语言的字符串。有关更多信息,请参阅国际化部分。
测试
现在您可以重启WebYaST服务器,方法是
rcwebyast restart
打开浏览器并访问https://:4984,使用用户root登录并选择example模块
WebYaST 示例插件 < 0.3
虽然REST服务负责功能,但Web客户端为浏览器提供了一个精美的GUI。
设置环境
有不同的可能性来获得一个正在运行的开发环境
- 安装 WebYaST 到您的本地机器。
- 在设备中使用 WebYaST。
我们采用第二种方法(通过设备),因为它不会干扰您的本地环境。因此,您需要创建一个设备并使用首选实用程序(VMware、VirtualBox等)启动它。
本教程描述了两种方法,以展示示例插件的工作方式。
简单的方法...
...将是通过RPM安装示例插件并与之交互。这两个软件包是
- webyast-example-ws 用于REST服务
- webyast-example-ui 用于UI
请下载并安装适合您的SuSE版本的RPM,并使用以下命令重启服务:
rcyastws restart
rcyastwc restart
示例插件现在已准备好使用。
复杂的方法...
...将是手动创建上述 RPM 包中包含的所有插件文件。这种方法需要更多的工作,但更深入地展示了 WebYaST 的工作原理。
PolkitPolicit
在开始程序之前,我们将定义新模块的权限。
定义 PolkitPolicies
每个Yast模块都提供自己的策略文件,该文件定义了可以授予用户的操作。它们存储在/usr/share/PolicyKit/policy/中,通常具有org.opensuse.yast.system.module_name.policy的形式。对于示例模块,我们需要类似的文件读写权限,因此创建org.opensuse.yast.system.example.policy文件并向其中添加以下行
<?xml version="1.0" encoding="UTF-8"?>
<!DOCTYPE policyconfig PUBLIC
 "-//freedesktop//DTD PolicyKit Policy Configuration 1.0//EN"
 "http://www.freedesktop.org/standards/PolicyKit/1.0/policyconfig.dtd">
<policyconfig>

  <vendor>YaST Webservice Project</vendor>
  <vendor_url>https://en.opensuse.net.cn/YAST</vendor_url>

  <action id="org.opensuse.yast.system.example.read">
    <description>Description of action</description>
    <message>Authentication message which appear on desktop (not affect webyast)</message>
    <defaults>
      <allow_inactive>no</allow_inactive>
      <allow_active>no</allow_active>
    </defaults>
  </action>

  <action id="org.opensuse.yast.system.example.write">
    <description>Description of action</description>
    <message>Authentication message which appear on desktop (not affect webyast)</message>
    <defaults>
      <allow_inactive>no</allow_inactive>
      <allow_active>no</allow_active>
    </defaults>
  </action>
</policyconfig>
授予 PolkitPolicies
如果您想在开发期间监视您的模块,您需要授予登录到 WebYaST 的用户(例如 root)一些权限。
polkit-auth --user root --grant org.opensuse.yast.system.example.write
polkit-auth --user root --grant org.opensuse.yast.system.example.read
由于WebYaST REST服务也将访问该文件,因此我们必须将这些权限授予REST服务用户(REST服务在用户yastws下运行)。
polkit-auth --user yastws --grant org.opensuse.yast.system.example.write
polkit-auth --user yastws --grant org.opensuse.yast.system.example.read
D-Bus 服务
D-Bus 服务在 root 下运行。此服务处理对 /var/log/YaST2/example_file 的“真实”文件访问。
有两种方法可以创建 D-Bus 服务。您可以使用现有的 YaST 模块并仅创建一个 D-Bus 接口,或者您可以编写一个独立的 service。
由于没有用于读取/写入文件的 YaST 模块,因此此处使用独立的、与 YaST 无关的 D-Bus 服务。
D-Bus 服务:example.service
D-Bus 接口:example.service.Interface
D-Bus 对象路径:/org/example/service/Interface
创建 D-Bus 服务
D-Bus 服务可以使用各种语言编写。由于 WebYaST 本身是用 Ruby 编写的,因此下面的示例也是用 Ruby 编写的。
将以下骨架放入您选择的二进制路径中,以便与下面的示例匹配,放入 /usr/local/sbin/exampleService.rb
第一部分连接到系统总线并注册服务。
#!/usr/bin/env ruby
require 'rubygems'
require 'dbus'

# Choose the bus (could also be DBus::session_bus, which is not suitable for a system service)
bus = DBus::system_bus
# Define the service name
service = bus.request_service("example.service")
创建对象类及其接口。在接口中,创建所有方法。
在下面的示例中,该接口提供了两种方法
- read,它读取指定的文件并将其作为字符串返回(请注意,需要将其括在数组中,因为 DBus 有多个返回值,因此它返回返回值的数组)
- 写入,将指定的字符串写入文件
class ExampleService < DBus::Object
  FILENAME = "/var/log/YaST2/example_file"
  # Create an interface.
  dbus_interface "example.service.Interface" do
    # Define D-Bus methods of the service
    # This method reads whole file which name it gets as a parameter and returns its contents
    dbus_method :read, "out contents:s" do
      out = ""
      begin
        File.open(FILENAME, "r") {|f| out = f.read }
      rescue
        out = "<empty>"
      end
      [out] #return value must be array, as DBus allow multiple return value, so it expect array of return values
    end
    # This method dumps a string into a file
    dbus_method :write, "in contents:s" do |contents|
      File.open(FILENAME, 'w') {|f| f.write(contents) }
      []
    end
  end
end
创建对象并通过其路径导出
# Set the object path
obj = ExampleService.new("/org/example/service/Interface")
# Export it!
service.export(obj)
运行事件循环(在本例中,事件循环永远不会结束)。
# Now listen to incoming requests
main = DBus::Main.new
main << bus
main.run
使此文件可执行
chmod 755 /usr/local/sbin/exampleService.rb
创建所需权限
编辑/etc/dbus-1/system.d/example.service.conf并添加以下内容以授予访问和注册服务的权限
<!DOCTYPE busconfig PUBLIC "-//freedesktop//DTD D-BUS Bus Configuration 1.0//EN"
  "http://www.freedesktop.org/standards/dbus/1.0/busconfig.dtd">
<busconfig>
  <policy user="root">
    <allow own="example.service" />
    <allow send_destination="example.service" />
  </policy>
<!-- yastws user is one which runs yast webservice and
  he sends messages to service -->
  <policy user="yastws">
    <allow send_destination="example.service" />
    <!-- introspection is allowed -->
    <allow send_destination="example.service"
           send_interface="org.freedesktop.DBus.Introspectable" />
  </policy>
  <policy context="default">
    <deny send_destination="example.service"/>
    <deny send_destination="example.service"
           send_interface="org.freedesktop.DBus.Introspectable" />
  </policy>
</busconfig>
没有此文件,您甚至无法注册服务以进行测试。
上述配置允许root注册服务,yastws使用它。因此,该服务不能被任何其他用户使用,除了使用YaST Web服务权限的yastws。
启动服务
要自动启动服务,请创建服务激活配置文件/usr/share/dbus-1/system-services/example.service.service并添加以下内容
# DBus service activation config
[D-BUS Service]
Name=example.service
Exec=/usr/local/sbin/exampleService.rb
User=root
保留 [D-Bus Service] 部分名称,只需更新服务的名称和要执行的二进制文件。
测试服务
要测试该服务,只需调用其方法。以下示例显示了如何调用D-Bus服务。
#!/usr/bin/ruby
require 'rubygems'
require 'dbus'

bus = DBus.system_bus
ruby_service = bus.service("example.service")
obj = ruby_service.object("/org/example/service/Interface")
obj.introspect
obj.default_iface = "example.service.Interface"
puts obj.read
必须启动该服务 - 除非它自动完成(如下所示),只需运行/usr/local/sbin/exampleService.rb以root身份。
Rest-Service
准备
要开始正常开发,您需要通过检出git仓库并安装所需的软件包来获取源代码。有关更多信息,请参阅从源代码安装。在我们的示例中,我们使用已安装在/srv/www目录中的实际WebYaST服务,因为安装了软件包。
WebYaST 的所有模块都存储在 plug-ins 目录中,因此打开终端并为您的模块创建一个新目录
  cd /srv/www/yastws/vendor/plugins
  mkdir example/
  cd example/
至少您的新模块应该具有 app config lib package tasks 和 test 目录。继续创建它们。
mkdir app config lib package tasks test
现在更改目录到 app/ 并为模型、视图和控制器创建目录。
cd app
mkdir models views controllers
在开发期间,在一个单独的终端中打开生产日志可能会有所帮助。
tail -fn 100 /srv/www/yastws/log/passenger.log
模型
在模型中,您将定义示例类及其所有属性和方法。我们只需要一个变量来表示文件的内容。
更改目录到 models/ 并创建文件 example.rb。
可以使用 Ruby 的 attr_accessor 定义对变量的访问。我们需要在这里读取和写入访问权限。
class Example < BaseModel::Base
 attr_accessor :content
我们不从 ActiveRecord::Base 继承 Example,因为我们不需要数据库。但在许多具有复杂数据结构的情况下,我们需要定义自己的 to_xml 和 to_json 方法
  def to_xml(options = {})
    xml = options[:builder] ||= Builder::XmlMarkup.new(options)
    xml.instruct! unless options[:skip_instruct]
..
..
..
  end

  def to_json(options = {})
    hash = Hash.from_xml(to_xml())
    return hash.to_json
  end
这些方法将给定类的属性转换为 xml 或 json 格式,并将其作为返回值提供。请参阅其他插件以获取更多信息。
在我们的示例中,这些方法不需要,因为数据结构过于简单。因此,我们可以使用BaseModel::Base类的标准to_xml和to_json方法
现在让我们提供一些功能
  def initialize
    load_content
  end

  def load_content
    @content = dbus_obj.read
  end
使用 Example.new() 可以获取 Example 类的实例。此时,文件的内容已经读取并可用。
  def self.find(what=:one,options={})
    ret = Example.new
    ret.load_content
    ret
  end
每个模型类都应该有一个 find 方法才能获取数据。在我们的例子中,它与 initialize 方法相同,但还有一些其他情况,例如用户模型,其中 find 方法非常有用
- User.find(:all) 返回包含所有用户的数组
- User.find('tux') 返回用户 'tux' 的对象。
  def update
    dbus_obj.write @content
  end
此方法用于将内容写入文件。如您所见,我们正在使用DBUS服务来写入文件。此时不要使用IO方法。这会给您带来麻烦。由于WebYast将作为服务运行,它将拥有自己的用户yastws。该用户将没有root权限,但将通过DBUS服务和我们之前定义的PolicyKit权限访问系统。
最后,dbus_obj 助手,它通过上述 D-Bus 服务读取和写入
  def dbus_obj
    bus = DBus.system_bus
    ruby_service = bus.service("example.service")
    obj = ruby_service.object("/org/example/service/Interface")
    obj.introspect
    obj.default_iface = "example.service.Interface"
    obj
  end

end # the end of the model class
现在,由于我们可以读取/写入文件 /var/log/YaST2/example_file,我们可以继续使用控制器。
控制器
控制器将服务端的模型与Web客户端侧的表示连接起来。Web客户端向rest服务发送GET请求,并期望文件内容作为响应。这可以是xml或json格式,就像我们在模型中定义的那样。另一方面,Web客户端可以发送POST请求到rest服务,以更改文件。
更改目录到 controllers 并创建文件 example_controller.rb
 cd ../controllers
 vi example_controller.rb
class ExampleController < ApplicationController

  #require login before do any action
  before_filter :login_required
ApplicationController是rest服务的一部分,并提供一些我们需要的方法。因此,定义ExampleController类并从ApplicationController派生它。before_filter将在调用任何操作时执行login_required。它检查用户是否已登录,如果未登录则重定向到登录屏幕。
现在让我们定义show方法,该方法必须响应GET请求并收集数据。
  def show
    permission_check "org.opensuse.yast.system.example.read"
    example = Example.find

    respond_to do |format|
      format.xml  { render :xml => example.to_xml}
      format.json { render :json => example.to_json }
    end
  end
首先,permission_check检查用户是否有权。如果用户无权读取安全信息,则show操作会引发错误403并停止。否则,它通过调用其find方法创建一个新的Example对象。
show操作将Example对象响应给Web客户端,Web客户端必须在浏览器内处理显示。这将在这里发生。但是首先,您需要为新模块定义路由。
第二部分将通过 POST 请求写入值。
  def update
    permission_check "org.opensuse.yast.system.example.write"
    value = params["example"]
    if value.empty?
      raise InvalidParameters.new :example => "Missing"
    end

    example = Example.find
    example.content = value["content"] || ""
    example.save
    show
  end

end #close the ExampleController class
在写入值后,将调用show方法以返回已保存文件的当前内容。
定义路由
每个模块的路由在插件/example目录中的config/resources/example.yml中定义。
#interface can be anything
interface: org.opensuse.yast.system.example
#controller is path on which can be service located
controller: example
#singular set if it is singular REST service or not
singular: true
测试
您可以通过调用rcyastws restart以root权限重启REST服务。
现在您可以在浏览器中访问https://:4984查看您的新模块。链接名称是interface的值。您也可以直接访问https://:4984/example或键入https://:4984/example.xml以获取xml树。
另一种可能性是从命令行使用curl
curl -u root https://:4984/example.xml
获取值。
Web-Client
与服务一样,所有模块都存储在plugins目录中。在plugins目录中创建一个example目录,并在app目录中创建至少view、controller和models子目录。
cd /srv/www/yast/vendor/plugins
mkdir example
cd example
mkdir app package tasks test config
cd app
mkdir models views controllers
模型
创建一个简单的模型,该模型仅映射到REST服务
cd models
vi example.rb
并添加以下内容
class Example < ActiveResource::Base
  extend YastModel::Base
  model_interface :"org.opensuse.yast.system.example"
end
控制器
切换到controller目录并创建example_controller.rb文件。
cd ../controllers/
vi example_controller.rb
现在定义ExampleController类并从ApplicationController派生它,并包含yast/service_resource。创建一个before_filter。
require 'yast/service_resource'
require 'example'

class ExampleController < ApplicationController
  before_filter :login_required, :read_permissions
这将启动login_required操作,就像在rest服务的controller上一样,但也会在安全controller内部执行任何其他操作之前启动read_permissions操作。
  private

  def read_permissions
    @permissions = Example.permissions
  end
此方法读取权限并将其存储在实例变量中,以便其他函数或视图可以访问它们。
public

  # Initialize GetText and Content-Type.
  init_gettext "webyast-example-ui"
这部分仅在您想为您的 UI 提供其他语言/翻译时才需要。有关更多信息,请参阅 国际化 部分。
  # GET /example
  def index
    @example = Example.find(:one)
  end
这定义了'index'函数,该函数通过模型和REST服务读取文件内容,并相应地设置内部变量。
  # PUT /example
  def update
    @example = Example.find(:one)
    @example.content = params["example"]["content"]
    begin
      @example.save
      flash[:notice] = _("File saved")
    rescue Exception => error
      flash[:error] = _("Error while saving file: %s") % error.inspect
    end
    render :index
  end

end
通过调用Example.find,我们从rest服务请求一个新的Example实例。'params'哈希包含视图的POST参数。然后,update操作(在web客户端controller,example-controller.rb中)将包含新文件内容的'params'存储到Example实例中。save方法然后将带有Example实例的POST发送到rest服务的example模块。如果它响应错误,web客户端会显示错误消息。
最后,用户被重定向到example插件的index页面。
视图
在view中创建一个名为security的新目录,并为index操作编写一个view。
cd ../views
mkdir example
vi example/index.erb
在Web客户端侧,view仅包含一个文本区域,该文本区域显示文件的当前内容。该值可以更改并由Save按钮保存。
<div class="plugin-content plugin-border">
    <% form_tag '/example/update', :class => "webyast_form" do %>
      <div class="plugin-header">
        <div class="left">
          <label class="plugin-icon-container"><img class="plugin-icon" src="/icons/example_plugin.png"></label>
          <label class="plugin-name"><%=_("Example")%></label>
        </div>
        <div class="right" >
          <span id="questionMark" style="margin:2px 5px; float:none;">?</span>
        </div>
        <div class="clearfix"></div>
      </div>

      <div class="clearfix"> </div>
      <fieldset class="webyast_fieldset">
        <div class="fieldset_header">
          <span class="fieldset_header_title" >
            <%=_("Content of /var/log/YaST2/example_file")%>
          </span>
        </div>

        <div class="fieldset_body">
          <div class="row">
            <%= text_area(:example, :content, :cols => 125, :rows => 10) %>
          </div>
          <br>
        </div>
      </fieldset>

      <div class="button_container">
        <div class="hr"> </div>
        <div class="nav-buttons">
          <%= form_send_buttons :disabled => !@permissions[:write] %>
        </div>
      </div>
    <% end %>
  </div>
views/example/index.erb几乎是纯html。只有少量变量用于text_area、翻译和权限嵌入在ruby代码中。通过在controller中调用Example.permissions,我们设置了@permissions变量。@permissions[:write]包含true或false,并决定用户是否能够编辑文本区域。
为 WebYaST 添加启动图标
转到 plugins/example 并创建一个名为 shortcuts.yml 的文件,其中包含以下内容,以将图标添加到您的模块的控制中心。
main:
  icon: '/icons/example_plugin.png'
  url: /example
  groups: [ System ]
  title: _("Example")
  description: _("This is an example plugin only")
  read_permissions: [ org.opensuse.yast.system.example.read ]
将您自己的图标复制到/srv/www/yast/vendor/plugins/example/public/icons/example_plugin.png
每个文本字符串周围的“_(....)”
这种机制用于标记在UI中显示的并且需要提供多种语言的字符串。有关更多信息,请参阅国际化部分。
测试
现在您可以重启Web客户端。
rcyastwc restart
确保REST服务仍在运行。
rcyastws status
打开浏览器并访问https://:54984,使用用户root登录并选择example模块