SDB:在 openSUSE 中设置 Mediatomb
关于Mediatomb
Mediatomb是适用于Linux的开源媒体服务器软件。Mediatomb允许您将音乐和视频文件流式传输到其他媒体设备,例如(但不限于)游戏机等。
先决条件
计算机
- 受支持的媒体设备(受mediatomb 支持)
- 网络接口(例如,以太网网卡、路由器)
软件
在开始设置mediatomb 之前,必须安装以下软件包(文件结尾为.rpm)。
mediatomb
mediatomb-mysql
mediatomb-sqlite
无论如何,都需要主 mediatomb 软件包,因为该软件包包含mediatomb 本身。其他软件包用于mediatomb 的媒体文件数据库。具体取决于您的Linux发行版,mediatomb 使用哪种类型的数据库。
安装指南
所需的软件包位于 PackMan 在线软件仓库
mediatomb 软件,前提是已满足所有先决条件。使用 YaST
1) 将 PackMan 在线软件仓库添加到您的仓库列表中。(有关更多信息,请参阅 Additional package repositories 页面)。
2) 打开 YaST > 软件 > 软件管理
3) 在搜索框中键入 mediatomb 并按 Enter(确保勾选 mediatomb 旁边的框)。
4) 接受 YaST 安装 mediatomb 的建议。
使用您的Web浏览器
1) 打开您的Web浏览器。
2) 转到 PackMan 在线软件仓库
3) 单击您的openSUSE版本。
4) 单击 一键安装 功能。
5) 接受 YaST 安装 mediatomb 的建议。
配置指南
防火墙指南
root 身份运行 YaST(有关更多信息,请参阅 SDB:Login_as_root)。以下指南还假定您已在计算机上安装 mediatomb。提示: 您可以配置 mediatomb 在特定的TCP端口上运行,请参阅下面的部分。
打开 YaST > 安全和用户 > 防火墙 > 允许的服务 > 高级
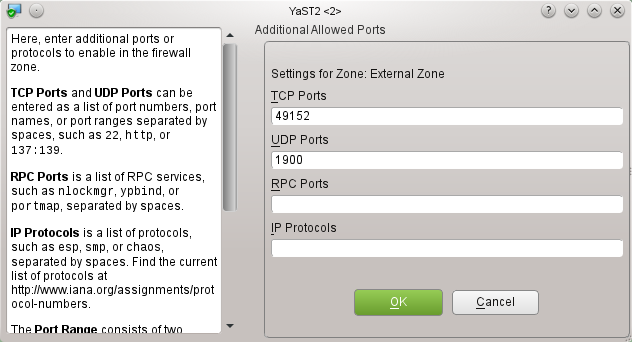
将必要的TCP 和 UDP 端口添加到 TCP 端口 和 UDP 端口 字段(请参阅上面的屏幕截图,以了解示例)。您计算机的防火墙现在应该允许 mediatomb “看到”您的媒体设备,反之亦然。
在本地用户帐户下配置mediatomb
默认情况下,mediatomb 使用位于 /home/USERNAME/.mediatomb 文件夹中的名为 config.xml 的文件(其中 USERNAME 是您的用户名)。您可以编辑此文件以更改 mediatomb 的设置,或者至少可以更改一些设置,通过 mediatomb Web 界面。
config.xml。mediatomb 首次使用/创建 config.xml 步骤
第 1 步
打开一个终端窗口(KDE 中的 Konsole)。
第 2 步
键入 mediatomb 然后按 Enter。
现在应该创建 config.xml。
将mediatomb配置为服务
要将 mediatomb 作为系统服务运行,您需要编辑由 mediatomb 软件包(RPM 包)安装的一些配置文件。
第一步
第一步是编辑 /etc/mediatomb.conf
以下是 /etc/mediatomb.conf(mediatomb 的系统范围配置文件)的副本
## This is a sambel configuration file for the MediaTomb daemon script
## used on Fedora Core

## By default the configuration will be created in /etc/mediatomb

## Network interface on which the server will run, you need to edit this!
MT_INTERFACE="eno1"

## User defined command line options that may be passed to the server
MT_OPTIONS=""

## MediaTomb will be started on port 50500
MT_PORT="49152"

## MediaTomb will run as mediatomb
MT_USER="mediatomb"
MT_GROUP="mediatomb"

## Location of the PID file
MT_PIDFILE="/var/run/mediatomb.pid"

## Location of the log file
MT_LOGFILE="/var/log/mediatomb"

## Location of the config file/database
MT_HOME="/etc"
MT_CFGDIR="mediatomb"
如下所述,您需要编辑 mediatomb.conf 的这一部分
## Network interface on which the server will run, you need to edit this!
MT_INTERFACE="eno1"
如果您的网络接口的系统名称是 eth1,那么您需要用它替换 eno1。
您可以在下面选择 mediatomb 绑定的 TCP 端口;
## MediaTomb will be started on port 50500
MT_PORT="49152"
Mediatomb 将在此示例中绑定到 TCP 端口 49152,为了本指南的目的,将 50500 更改为 49152。
启动和停止mediatomb服务
您可以通过 YaST(简单方法)或通过 shell 启动服务。
使用 YaST
打开 YaST > 系统 > 服务管理器
选择 mediatomb 系统服务,然后单击 启动/停止 按钮。
使用 shell
您可以使用以下命令(以 root 身份)启动/停止和检查 mediatomb 系统服务的状态;
rcmediatomb start
rcmediatomb stop
rcmediatomb status
如果 mediatomb 服务失败启动,您可能需要进行更多配置。您可以运行以下命令来检查服务;
systemctl -l status mediatomb.service
journalctl -xn
如果您从 systemctl -l status mediatomb.service 命令中看到以下内容;
mediatomb.service - LSB: MediaTomb daemon
   Loaded: loaded (/etc/init.d/mediatomb)
   Active: failed (Result: resources) since Fri 2016-04-29 21:12:30 ACST; 11s ago
  Process: 16771 ExecStart=/etc/init.d/mediatomb start (code=exited, status=5)

Apr 29 21:12:30 your_pc's_name_here mediatomb[16771]: /usr/bin/mediatomb not installed
Apr 29 21:12:30 your_pc's_name_here systemd[1]: PID file /var/run/mediatomb.pid not readable (yet?) after start.
Apr 29 21:12:30 your_pc's_name_here systemd[1]: Failed to start LSB: MediaTomb daemon.
Apr 29 21:12:30 your_pc's_name_here systemd[1]: Unit mediatomb.service entered failed state.
您需要编辑 /etc/init.d/mediatomb;因为 mediatomb 的系统服务正在寻找一个不存在的可执行文件。正如以下错误消息所示。
Apr 29 21:12:30 your_pc's_name_here mediatomb[16771]: /usr/bin/mediatomb not installed
因此,您需要更改上述脚本中的一些行,该脚本启动 mediatomb 系统服务。如果您的系统安装了 mediatomb-mysql 软件包,请参阅下面针对 mediatomb 系统服务的修改脚本的示例。如果您的系统安装了 mediatomb-sqlite 包,请将 mediatomb-mysql 替换为 mediatomb-sqlite。
以下是使用 mysql 作为 mediatomb 数据库格式的 /etc/init.d/mediatomb 脚本的示例。
#!/bin/sh
#
# mediatomb This script starts and stops the mediatomb daemon
#
# processname: mediatomb
# description: mediatomb is a daemon process which provides a UPnP service
# config: /etc/mediatomb
# config: /etc/mediatomb/config.xml
# pidfile: /var/run/mediatomb.pid

### BEGIN INIT INFO
# Provides:     mediatomb
# Required-Start:   $local_fs $remote_fs $network
# Required-Stop:    $local_fs $remote_fs $network
# Default-Start:    3 5
# Default-Stop:     0 1 2 6
# Short-Description:    MediaTomb daemon
# Description:      This script starts and stops the mediatomb daemon
### END INIT INFO

# Source function library.
. /etc/rc.status
rc_reset

# Source networking configuration.
#. /etc/sysconfig/network

# Set default mediatomb configuration.

# either make an installation in /etc/mediatomb and leave this blank,
# or specify an alternative config file location using the -c option
# Note: be aware, that -i parameter is used to set the ip of the
# interface specified above

. /etc/mediatomb.conf

###############################
# make sure to run it as $MT_USER
MEDIATOMB="-d -u $MT_USER -g $MT_GROUP -P $MT_PIDFILE -l $MT_LOGFILE -m $MT_HOME -f $MT_CFGDIR -p $MT_PORT"

test -x "/usr/bin/mediatomb-mysql" || { echo "/usr/bin/mediatomb not installed";
	if [ "$1" = "stop" ]; then exit 0;
	else exit 5; fi; }

[ ${MT_INTERFACE} = "NOT_SET" ] && echo "Please edit /etc/mediatomb.conf and change \
the MT_INTERFACE variable to your network device (eth0, eth1, etc.)" && exit 0

PATH="$PATH:/usr/bin:/usr/local/bin"

IFACE_IP=`ifconfig | grep -i "$MT_INTERFACE" -A 1|grep "inet addr"|cut -d " " -f 12|cut -d ":" -f 2`
[ -d /var/lock/subsys/ ] || mkdir -p /var/lock/subsys/

# By default it's all good
RETVAL=0

# See how we were called.
case "$1" in
	start)
		# Start daemon.
		echo -n "Applying multicast settings to $MT_INTERFACE... "
		# those settings are necessary for us to react to M-SEARCH requests
		route add -net 239.0.0.0 netmask 255.0.0.0 $MT_INTERFACE >/dev/null 2>&1
		ifconfig $MT_INTERFACE allmulti
		touch $MT_PIDFILE
		chown $MT_USER $MT_PIDFILE

		mkdir -p "/$MT_HOME/$MT_CFGDIR"
		chown $MT_USER "/$MT_HOME/$MT_CFGDIR"

		echo -n "Starting mediatomb: "
		mediatomb-mysql $MEDIATOMB $IFACE_IP $MT_OPTIONS
		RETVAL=$?
		rc_status -v
		[ $RETVAL = 0 ] && touch /var/lock/subsys/mediatomb
		;;
	stop)
		# Stop daemons.
		echo -n "Shutting down mediatomb: "
		killproc mediatomb
		RETVAL=$?
		rc_status -v

		[ $RETVAL = 0 ] && rm -f /var/lock/subsys/mediatomb
		;;
	restart)
		$0 stop
		$0 start
		;;
	reload)
		$0 stop
		$0 start
		;;
	condrestart)
		[ -e /var/lock/subsys/mediatomb ] && $0 restart
		;;
	status)
		if test -e $MT_PIDFILE ; then
			echo " seems running"
		else
			echo " not running"
		fi
		RETVAL=$?
		;;
	*)
		echo "Usage: $0 {start|stop|restart|status|condrestart}"
		RETVAL=1
		;;
esac

rc_exit
如您所见,现在有一个真实的可执行文件(确实存在)。
系统启动时自动启动服务
您可以使用 YaST 服务管理器让 mediatomb 服务在系统启动时启动。
使用 YaST 服务管理器
要启用/禁用 mediatomb 系统服务的自动启动,请按照以下步骤操作;
打开 YaST > 系统 > 服务管理器
然后选择 mediatomb 服务,然后单击下图所示的 启用/禁用 按钮;
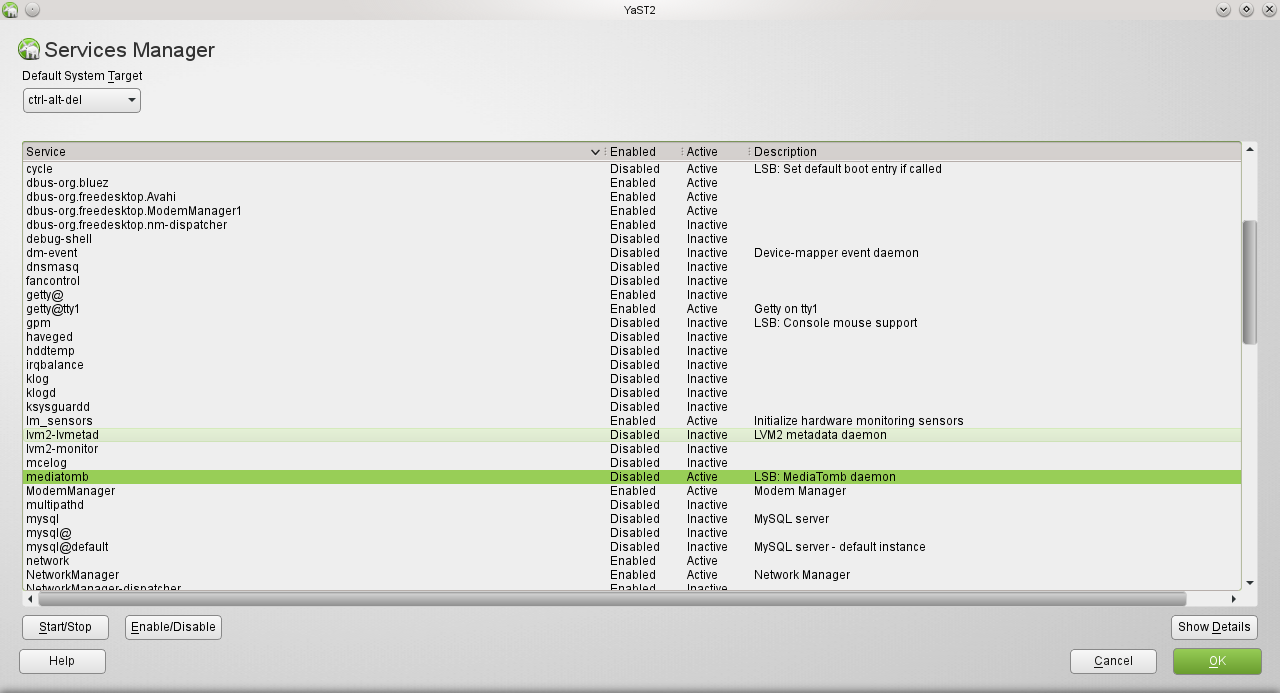
就这样了,mediatomb 服务应该在每次系统启动时启动!
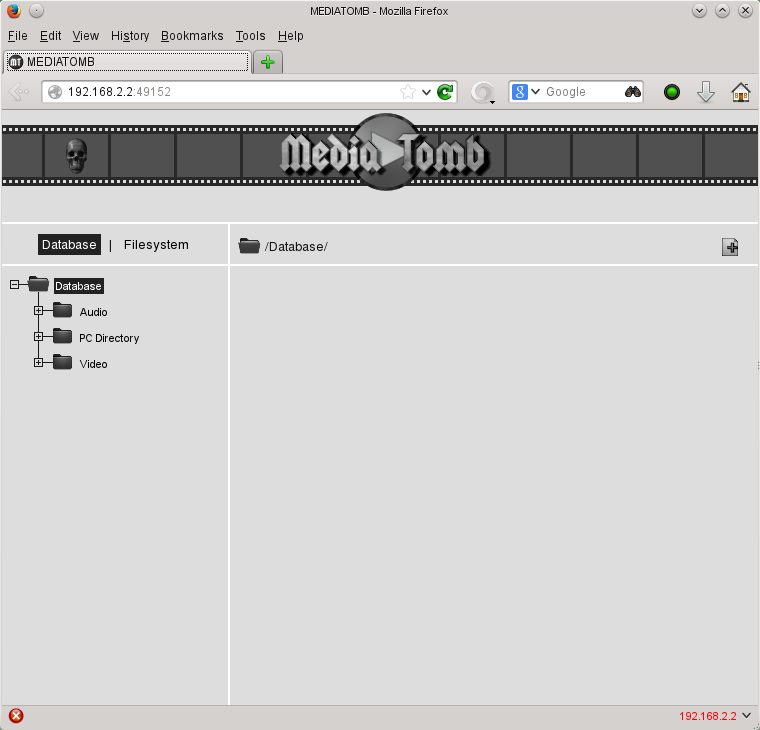
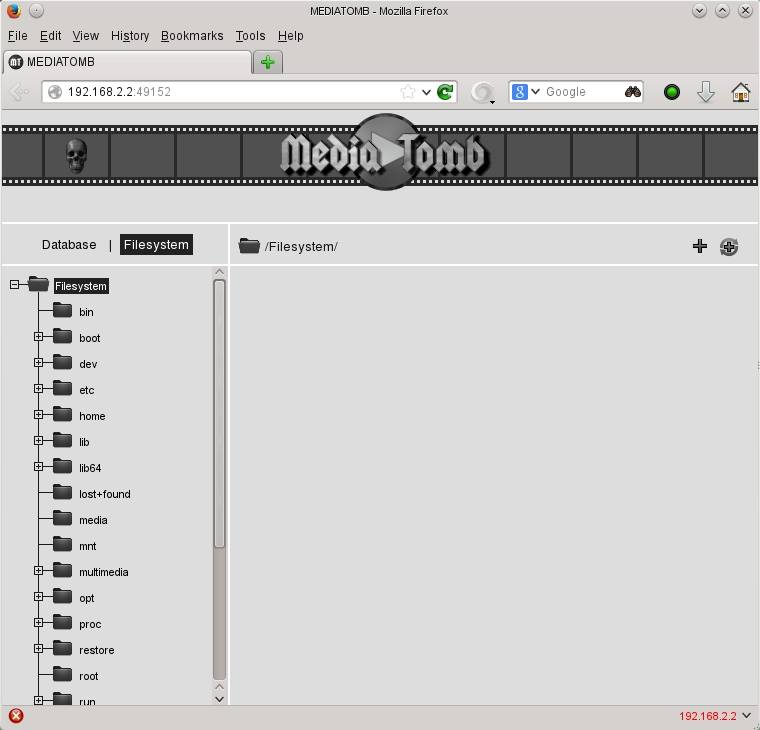
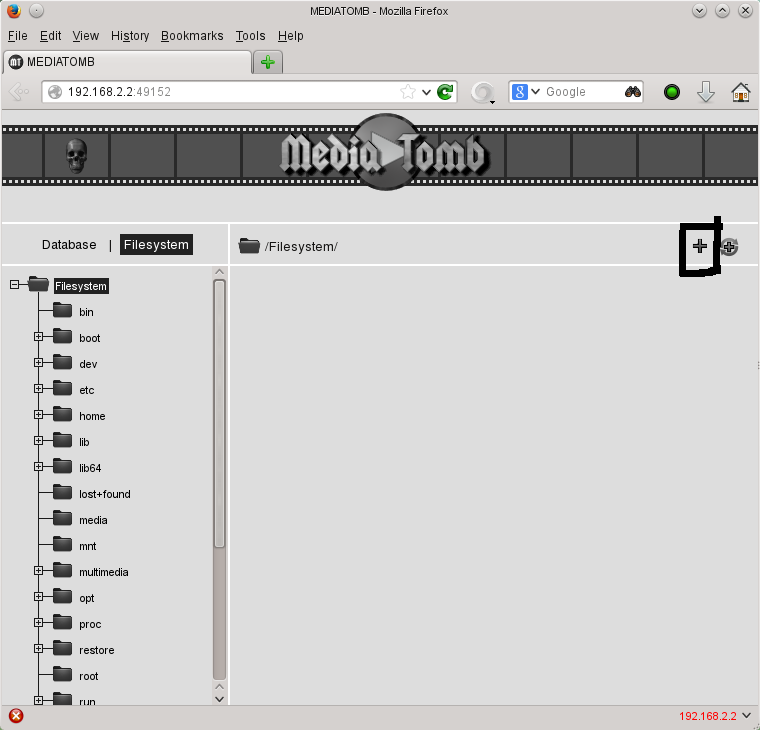
将媒体文件添加到数据库
以下是 mediatomb Web 界面的屏幕截图。
访问mediatomb Web界面
第 1 步
打开您的Web浏览器。
第 2 步
您可以通过两种方式访问 mediatomb Web 界面,在您的Web浏览器的地址栏中键入 localhost:TCP_port_here 或 YOUR_PC'S_IP_ADDRESS_HERE:TCP_port_here。
示例
192.168.2.3:49152
上面的示例使用 TCP 端口 49152 和 192.168.2.3 作为我的计算机的本地 IP 地址。
localhost:49152
上面的示例再次使用 TCP 端口 49152。
单击黑色方框内的图标以添加您的媒体文件。此选项只会将您选择的文件添加到 mediatomb 的媒体文件数据库中。
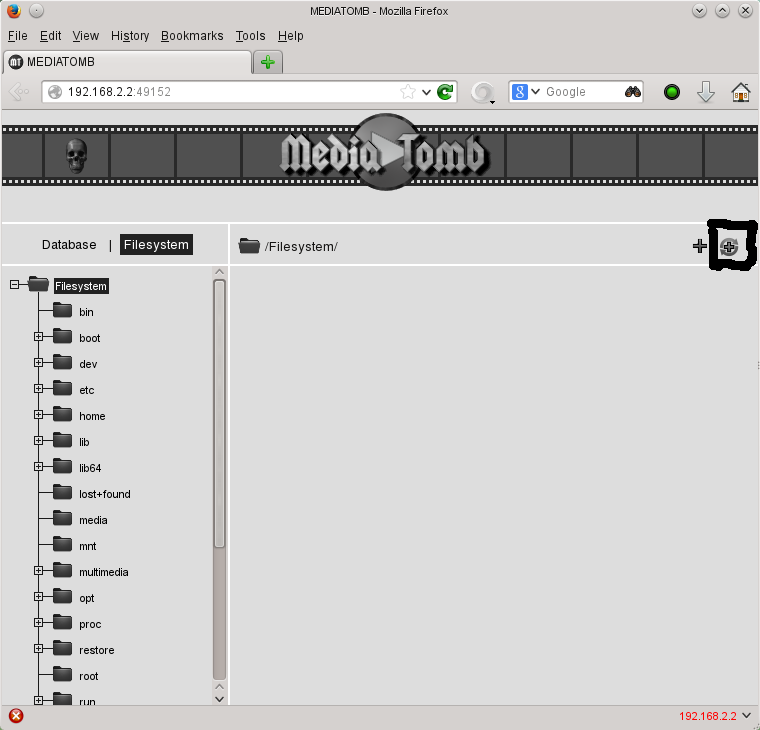
单击黑色方框内的图标以添加您的媒体文件。此选项会将文件夹添加为“自动扫描”目录。因此,如果您将更多媒体文件添加到所选文件夹,mediatomb 将自动“看到”它们(因此,您无需执行任何操作,在为所选文件夹添加文件到 mediatomb 数据库之后)。
编辑mediatomb的配置文件
以下是 config.xml 的示例
<?xml version="1.0" encoding="UTF-8"?>
<config version="2" xmlns="http://mediatomb.cc/config/2" xmlns:xsi="http://www.w3.org/2001/XMLSchema-instance" xsi:schemaLocation="http://mediatomb.cc/config/2 http://mediatomb.cc/config/2.xsd">
  <server>
    <ui enabled="yes" show-tooltips="yes">
      <accounts enabled="no" session-timeout="30">
        <account user="mediatomb" password="mediatomb"/>
      </accounts>
    </ui>
    <name>MediaTomb Media Server</name>
    <port>49152</port>
    <udn>uuid:fb48dd98-ad1e-4cf0-9cc7-9c9fc7a56009</udn>
    <home>/home/james/.mediatomb</home>
    <webroot>/usr/share/mediatomb/web</webroot>
    <storage>
      <sqlite3 enabled="yes">
        <database-file>mediatomb.db</database-file>
      </sqlite3>
    </storage>
    <protocolInfo extend="yes"/><!-- For PS3 support change to "yes" -->
    <!--
       Uncomment the lines below to get rid of jerky avi playback on the
       DSM320 or to enable subtitles support on the DSM units
    -->
    <!--
    <custom-http-headers>
      <add header="X-User-Agent: redsonic"/>
    </custom-http-headers>

    <manufacturerURL>redsonic.com</manufacturerURL>
    <modelNumber>105</modelNumber>
    -->
    <!-- Uncomment the line below if you have a Telegent TG100 -->
    <!--
       <upnp-string-limit>101</upnp-string-limit>
    -->
    <extended-runtime-options>
      <ffmpegthumbnailer enabled="yes">
        <thumbnail-size>128</thumbnail-size>
        <seek-percentage>5</seek-percentage>
        <filmstrip-overlay>yes</filmstrip-overlay>
        <workaround-bugs>no</workaround-bugs>
        <image-quality>8</image-quality>
      </ffmpegthumbnailer>
      <mark-played-items enabled="no" suppress-cds-updates="yes">
        <string mode="prepend">*</string>
        <mark>
          <content>video</content>
        </mark>
      </mark-played-items>
    </extended-runtime-options>
  </server>
  <import hidden-files="no">
    <scripting script-charset="UTF-8">
      <common-script>/usr/share/mediatomb/js/common.js</common-script>
      <playlist-script>/usr/share/mediatomb/js/playlists.js</playlist-script>
      <virtual-layout type="builtin">
        <import-script>/usr/share/mediatomb/js/import.js</import-script>
      </virtual-layout>
    </scripting>
    <mappings>
      <extension-mimetype ignore-unknown="no">
        <map from="mp3" to="audio/mpeg"/>
        <map from="ogx" to="application/ogg"/>
        <map from="ogv" to="video/ogg"/>
        <map from="oga" to="audio/ogg"/>
        <map from="ogg" to="audio/ogg"/>
        <map from="ogm" to="video/ogg"/>
        <map from="asf" to="video/x-ms-asf"/>
        <map from="asx" to="video/x-ms-asf"/>
        <map from="wma" to="audio/x-ms-wma"/>
        <map from="wax" to="audio/x-ms-wax"/>
        <map from="wmv" to="video/x-ms-wmv"/>
        <map from="wvx" to="video/x-ms-wvx"/>
        <map from="wm" to="video/x-ms-wm"/>
        <map from="wmx" to="video/x-ms-wmx"/>
        <map from="m3u" to="audio/x-mpegurl"/>
        <map from="pls" to="audio/x-scpls"/>
        <map from="flv" to="video/x-flv"/>
        <map from="mkv" to="video/x-matroska"/>
        <map from="mka" to="audio/x-matroska"/>
        <!-- Uncomment the line below for PS3 divx support -->
        <!-- <map from="avi" to="video/divx"/> -->
        <!-- Uncomment the line below for D-Link DSM / ZyXEL DMA-1000 -->
        <!-- <map from="avi" to="video/avi"/> -->
      </extension-mimetype>
      <mimetype-upnpclass>
        <map from="audio/*" to="object.item.audioItem.musicTrack"/>
        <map from="video/*" to="object.item.videoItem"/>
        <map from="image/*" to="object.item.imageItem"/>
      </mimetype-upnpclass>
      <mimetype-contenttype>
        <treat mimetype="audio/mpeg" as="mp3"/>
        <treat mimetype="application/ogg" as="ogg"/>
        <treat mimetype="audio/x-flac" as="flac"/>
        <treat mimetype="image/jpeg" as="jpg"/>
        <treat mimetype="audio/x-mpegurl" as="playlist"/>
        <treat mimetype="audio/x-scpls" as="playlist"/>
        <treat mimetype="audio/x-wav" as="pcm"/>
        <treat mimetype="audio/L16" as="pcm"/>
        <treat mimetype="video/x-msvideo" as="avi"/>
        <treat mimetype="video/mp4" as="mp4"/>
        <treat mimetype="audio/mp4" as="mp4"/>
        <treat mimetype="application/x-iso9660" as="dvd"/>
        <treat mimetype="application/x-iso9660-image" as="dvd"/>
      </mimetype-contenttype>
    </mappings>
    <online-content>
      <YouTube enabled="no" refresh="28800" update-at-start="no" purge-after="604800" racy-content="exclude" format="mp4" hd="no">
        <favorites user="mediatomb"/>
        <standardfeed feed="most_viewed" time-range="today"/>
        <playlists user="mediatomb"/>
        <uploads user="mediatomb"/>
        <standardfeed feed="recently_featured" time-range="today"/>
      </YouTube>
    </online-content>
  </import>
  <transcoding enabled="no">
    <mimetype-profile-mappings>
      <transcode mimetype="video/x-flv" using="vlcmpeg"/>
      <transcode mimetype="application/ogg" using="vlcmpeg"/>
      <transcode mimetype="application/ogg" using="oggflac2raw"/>
      <transcode mimetype="audio/x-flac" using="oggflac2raw"/>
    </mimetype-profile-mappings>
    <profiles>
      <profile name="oggflac2raw" enabled="no" type="external">
        <mimetype>audio/L16</mimetype>
        <accept-url>no</accept-url>
        <first-resource>yes</first-resource>
        <accept-ogg-theora>no</accept-ogg-theora>
        <agent command="ogg123" arguments="-d raw -o byteorder:big -f %out %in"/>
        <buffer size="1048576" chunk-size="131072" fill-size="262144"/>
      </profile>
      <profile name="vlcmpeg" enabled="no" type="external">
        <mimetype>video/mpeg</mimetype>
        <accept-url>yes</accept-url>
        <first-resource>yes</first-resource>
        <accept-ogg-theora>yes</accept-ogg-theora>
        <agent command="vlc" arguments="-I dummy %in --sout #transcode{venc=ffmpeg,vcodec=mp2v,vb=4096,fps=25,aenc=ffmpeg,acodec=mpga,ab=192,samplerate=44100,channels=2}:standard{access=file,mux=ps,dst=%out} vlc:quit"/>
        <buffer size="14400000" chunk-size="512000" fill-size="120000"/>
      </profile>
    </profiles>
  </transcoding>
</config>
以下选项告诉 mediatomb 始终使用哪个 TCP 端口。
<port>number</port>
其中 number 是您希望 mediatomb 始终使用的 TCP 端口号。
故障排除指南
问) 为什么mediatomb没有在我的媒体设备上显示我的任何媒体文件?
答) 您需要使用 mediatomb Web 界面在 https://:49152/ 创建媒体文件数据库(这仅在您使用 TCP 端口 49152 时才有效)。
您还需要确保 mediatomb 正在运行,您可以使用 openSUSE 让 mediatomb 自动启动。
问) mediatomb 系统服务无法启动,并且 systemctl -l status mediatomb.service 命令给我以下错误消息;
mediatomb.service - LSB: MediaTomb daemon
   Loaded: loaded (/etc/init.d/mediatomb)
   Active: failed (Result: resources) since Fri 2016-04-29 20:13:06 ACST; 7min ago
  Process: 14103 ExecStart=/etc/init.d/mediatomb start (code=exited, status=0/SUCCESS)

Apr 29 20:12:57 your_pc_name_here mediatomb[14103]: Applying multicast settings to eno1... Starting mediatomb: ..done
Apr 29 20:12:57 your_pc_name_here systemd[1]: PID 14124 read from file /var/run/mediatomb.pid does not exist or is a zombie.
Apr 29 20:13:06 your_pc_name_here systemd[1]: mediatomb.service never wrote its PID file. Failing.
Apr 29 20:13:06 your_pc_name_here systemd[1]: Failed to start LSB: MediaTomb daemon.
Apr 29 20:13:06 your_pc_name_here systemd[1]: Unit mediatomb.service entered failed state.
答) 您需要确保您的网络接口正在运行,因为如果您的网络未运行,mediatomb 服务将无法运行。将您的PC连接到路由器并确保两者都已打开(并已连接)。